Have Canoe Trailer! Why Not?
Ralph Fox
Tired of wrestling your canoe onto the vehicle? Want to be able to load and launch a canoe alone while greatly reducing need to clean and grease wheel bearings or to repair/replace lights? Consider altering a small boat trailer similar to the one in our photos.
Through a free ad on www.craigslist.com asking for a small trailer for a canoe and stating, Can modify trailer, mine was bought for $100. It had good wheel bearings, serviceable tires, and a working coupler, but otherwise was ugly. It was adapted using the following:
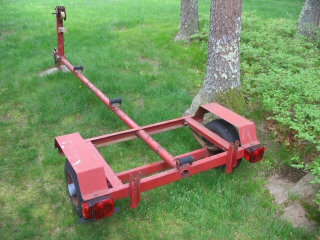
Trailer Purchased on CraigsList for $100
- Preliminary steps:
- Remove and scrap lights and wiring.
- Remove and scrap roller pins and rollers.
- Remove wood bunks and brackets. Save brackets.
- Remove winch (not to be re-used here).
- Remove bow stop bumper and replace insert.
- Lubricate coupler and check for function. Replace if needed.
- Remove wheels.
- Remove any rust or loose paint from rims.
- Prime and paint rims.
- Clean wheel bearings and re-pack with grease.
- Mount wheels.
- Wire brush/sand away rust or flaking paint from trailer.
- Prime trailer with Rustoleum or similar paint.
- Hammer roller brackets horizontal to make the one at the rear of the trailer flat and those on the tongue both flat and level.
- Assembly:
- Note: All fasteners are galvanized or equivalent.
- Attach a 6 x 6 x 15 pressure treated block to each tongue roller bracket using 2 - 3/8 x 4 lag screws and heavy duty washers. These blocks raise the canoe to clear the fenders.
- Bolt a 2 x 4 x 4 pressure treated board at its middle to each bunk bracket. This makes bunk support assemblies.
- Fasten 2 2 x 4 x 10 pressure treated boards flat onto the 6 x 6 x 15 riser blocks flush with their outside edges using #8 x 3 Deck Mate, Phillips, Square Drive, All Purpose, Exterior screws.
- Position a bunk board support assembly under a 2 x 4 x 10 bunk board. Have the bracket against the rear of the trailer and tilted outward 20-25 degrees at the bottom to make the 10 bunk approximate the curve of the canoe at that point. Mark for holes on rear of trailer and 7/16 drill them for 2 3/8 x 1 hex head bolts at each bracket. Secure loosely with HD washers and lock washers. Install the other bunk support assembly, adjust height of both, and tighten bolts.
- Using #8 x 3 Deck Mate screws, fasten 10 bunk boards to 4 bunk support boards.
- Drill if needed and attach a 5/16 x 1 eye bolt with HD washer and lockwasher at each outside end of trailer for a tie down strap.
- Attach a 5/16 x 1 eye bolt about 1½ 2 above trailer tongue to bow post. Fasten by first threading an extra nut against the eye and adding a HD washer. Then insert the threaded end through the bow post from the front. Secure with another HD washer, lock washer, and nut. The eye will accept hooks from the bow tie down strap.
- Set canoe on trailer to judge mounting height and attach bow bumper bracket without its insert until painted. For my 14 6 canoe, the bracket is mounted near the top of the post.
- If your canoe is 16 on longer, consider whether the following instructions for a light mounting bar will have lights obscured by the canoe. You may want to instead make a removable light bar to be mounted farther back and on top of the canoe.
- Remove canoe.
- Using #8 x 3 Deck Mate screws, attach a 2 x 2 x 3 pressure treated board centered horizontally across ends of the 4 bunk support boards. To ease later carpet installation, have top edge of 2 x 2 down ½ from tops of 4 members. (If aluminum box tubing could be used for this bar, it would be better. Make it 3 8 long.)
- Make a mounting and grounding bar for lights by attaching a ½ x 1½ x 3 8 aluminum channel. Position it with open side facing front and fasten with 2 3/8 x 2 lag screws and washers. The channel should overhang the 2 x 2 by 4 at each end.
- VIN The vehicle identification number may be missing. If so, check with your local authorities for instructions. In our state, we register it as a home built trailer using a VIN the builder assigns. Last name and birth date are suggested i.e. VIN: FOX 112733. Sketch it in pencil and use a center punch firmly to create it. Remember a final coat of paint is to come so make deep impressions.
- Paint final coat except 4 at ends of aluminum mounting channel where lights must make ground. Install bow bumper insert.
- Carpet bunk boards:
- Use a 12 x 12 long piece of indoor/outdoor carpet for each bunk fastened with 1¼ Hot Galvanized (copper preferred if available) roofing nails.
- This work is more easily done by turning trailer upside down. To reduce bounce when nailing, lean the front end of a bunk board against a tree or other support with the other end on the ground.
- Leave carpet ends until last. Starting in the middle, overlap edges between supports and fasten with roofing nails 3 apart.
- Tuck carpet edge under itself along edges of 4 bunk supports and nail to what will be bottom of bunk board. You may need to trim away excess carpet.
- At tongue support blocks, cut just enough to allow carpet to be tucked under itself and nailed to sides of 10 board using 3 roofing nails per side at each block.
- At ends, fold sides under then bring ends over what will be the bottom of 10 members. Fasten each end with 4 roofing nails.
- Turn trailer upright. Smile! Looking good already!
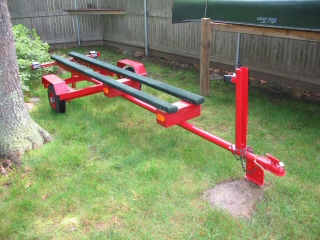
Bunkboards on Finished Trailer - Install lights:
- If tongue is rusty inside, insert a piece of garden hose full length to accept wiring and protect it from chafing. Secure hose at each end with copper wire as from electric wire. Twist one wire onto the hose at each end. Twist rear wire onto the flattened bracket and the front to a coupler bolt.
- Fasten lights to aluminum mounting channel.
- Wire lights by inserting wiring into hose from front of trailer. Follow color code directions and attach to lights.
- Fasten the ground wire to aluminum channel. Drill under a 10 bunk board ¾ from top of aluminum. Scrape away paint around hole for a good ground and secure wire with a hex head sheet metal screw.
- Add wire hangers and ties to restrain loose wires.
- Add yellow reflectors to 6 x 6 riser blocks.
- Install hull guard:
- Using a 4 wide piece of flexible plastic, wrap it around the wood and aluminum member between the 10 bunks at the rear. Fasten underneath with 2 3/8 x 1 lag screws and washers into the wood portion. This will protect your canoe from scraping on the aluminum.
- Register your trailer and enjoy!
- Suggestions for use:
- There is no need to float canoe off trailer as with a heavier boat! Try backing the trailer into the water enough to barely wet the wheel rims, but not the hubs. This will keep water from bearing grease and dramatically reduce need to clean and re-pack bearings. It also keeps lights dry and eliminates need to repair or replace them every year or two. Nice!
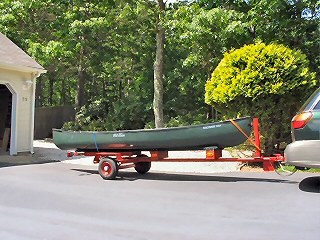
- A 20 tether attached to the bow of the canoe makes launching a delight. Hold the other end of the tether and give the canoe a shove. It launches readily and may then be brought to shore or a dock.
- Upon loading, remove heavy objects from canoe, position the trailer, and again use the tether. Push the canoe beyond trailer and walk out on the bunks. Pull canoe to rear of trailer, grasp the bow, lift it onto the bunks, and slide canoe forward. Piece of cake!
- Attach bow strap and drive off ramp to finish unloading and strapping for travel.
- If your canoe is some form of plastic, check with the maker for storage instructions. Especially look for guidance about having a tarp against the hull as in some instances that may lead to hull warping due to heat trapped there.
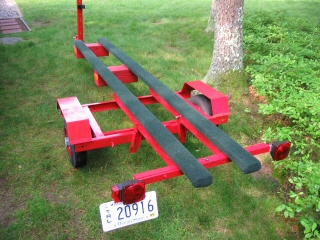
Finished Trailer with Lights Installed
Disclaimer: All trade names and product names are the intellectual property of their respective owners.